Step by step configuration of the Azure AD Join AVD VM’s and how to use FSLogix Cloud Cached Configuration
Hello all, hope you are doing well, recently I got a request from one of my regular blog readers to write a detailed step-by-step creation of AVD with Azure AD joined session hosts. Also, he would like to see how we can configure FSLogix with cached mode enabled, which can help any organization that is planning for the DR of the Azure Virtual Desktops. This post will cover both things in detail, and I think it will be considered a very helpful post for the AVD admins.
Now Let’s start from scratch. In the first step, we will see how we will create a new host pool.
How to create a Pooled Hostpool for AADJ VMs:
To start creating your new host pool:
- Sign in to the Azure portal at https://portal.azure.com.
- Enter Azure Virtual Desktop into the search bar, then find and select Azure Virtual Desktop under Services.
- In the Azure Virtual Desktop overview page, select Create a host pool.
- In the Basics tab, select the correct subscription under Project details.
- Either select Create new to make a new resource group or select an existing resource group from the drop-down menu.
- Enter a unique name for your host pool.
- In the Location field, select the region where you want to create the host pool from the drop-down menu.
The Azure geography associated with the regions you selected is where the metadata for this hosted pool and its related objects will be stored. Make sure you choose the regions inside the geography you want the service metadata to be stored in.
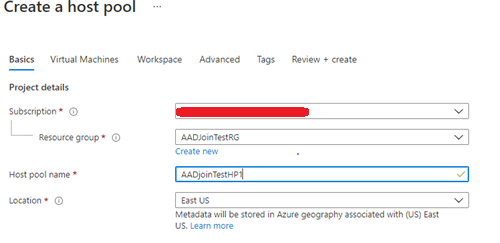
- Under Host pool type, select whether your host pool will be Pooled.
Pooled, enter the following information:
- For Max session limit, enter the maximum number of users you want load-balanced to a single session host.
- For the Load balancing algorithm, choose either breadth-first or depth-first, based on your usage pattern. Learn more about what each of these options means at Host pool load-balancing methods.

Select Next: Virtual Machines >.
Virtual machine details:
To set up your virtual machine within the Azure portal host pool setup process:
- Under Resource group, choose the resource group where you want to create the virtual machines. This can be a different resource group than the one you used for the host pool.
- After that, provide a Name prefix to name the virtual machines the setup process creates. The suffix will be – with numbers starting from 0.
- Choose the Virtual machine location where you want to create the virtual machines. They can be the same or different from the region you selected for the host pool. Keep in mind that VM prices vary by region, and the VM locations should be near their users when possible to maximize performance. Learn more at Data locations for Azure Virtual Desktop.
- Next, choose the available option that best suits your needs. To learn more about which option is right for you, see Availability options for virtual machines in Azure and our FAQ.

- Next, choose the security type that you would like to use for your virtual machines. You can choose either Standard or Trusted Launch virtual machines. To learn more about Trusted Launch virtual machines, see Trusted Launch for Azure virtual machines.

If Trusted Launch virtual machines are selected, choose which Trusted Launch security features you would like to enable.

- Next, choose the image that needs to be used to create the virtual machine. You can choose either Gallery or Storage blob.
If you choose Gallery, select one of the recommended images from the drop-down menu:
- Windows 10 Enterprise multi-session, Version 1909
- Windows 10 Enterprise multi-session, Version 1909 + Microsoft 365 Apps
- Windows Server 2019 Datacenter
- Windows 10 Enterprise multi-session, Version 2004
- Windows 10 Enterprise multi-session, Version 2004 + Microsoft 365 Apps
If you don’t see the image you want, select See all images, which lets you select either another image in your gallery or an image provided by Microsoft and other publishers. Make sure that the image you choose is one of the supported OS images.
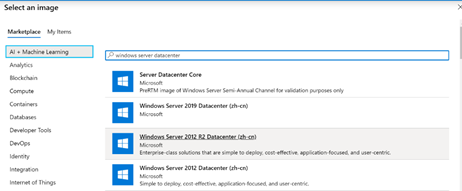
You can also go to My Items and choose a custom image you’ve already uploaded.
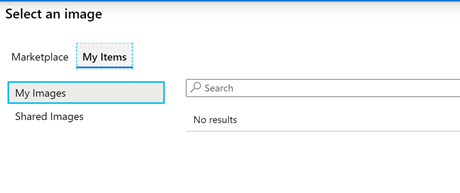
If you choose Storage Blob, you can use your image build through Hyper-V or on an Azure VM. All you have to do is enter the location of the image in the storage blob as a URI.
The image’s location is independent of the available option, but the image’s zone resiliency determines whether that image can be used with the availability zone. If you select an availability zone while creating your image, make sure you’re using an image from the gallery with zone resiliency enabled. To learn more about which zone resiliency option you should use, see the FAQ.
- After that, choose the Virtual machine size you want to use. You can either keep the default size as-is or select Change size to change the size. If you select Change size, in the window that appears, choose the size of the virtual machine suitable for your workload. To learn more about virtual machine sizes and which size you should choose, see Virtual machine sizing guidelines.
- Under Number of VMs, provide the number of VMs you want to create for your host pool.
Note
The setup process can create up to 400 VMs while setting up your host pool, and each VM setup process creates four objects in your resource group. Since the creation process doesn’t check your subscription quota, make sure the number of VMs you enter is within the Azure VM and API limits for your resource group and subscription. You can add more VMs after you finish creating your host pool.
- Choose what kind of OS disks you want your VMs to use: Standard SSD, Premium SSD, or Standard HDD.
- Under Network and security, select the Virtual Network and Subnet where you want to put the virtual machines you create. Make sure the virtual network can connect to the domain controller since you’ll need to join the virtual machines inside the virtual network to the domain. The DNS servers of the virtual network you selected should be configured to use the IP of the domain controller.
- Select what kind of security group you want: Basic, Advanced, or None.
If you select Basic, you’ll have to select whether you want any inbound ports open. If you select Yes, choose from the list of standard ports to allow inbound connections to.
Note
For greater security, we recommend that you don’t open public inbound ports.

If you choose Advanced, select an existing network security group that you’ve already configured.
- After that, select whether you want the virtual machines to be joined to Active Directory or Azure Active Directory (Preview).
- For Active Directory, provide an account to join the domain and choose if you want to join a specific domain and organizational unit.
- For the AD domain join UPN, enter the credentials for the Active Directory Domain admin of the virtual network you selected. The account you use can’t have multifactor authentication (MFA) enabled. When joining an Azure Active Directory Domain Services (Azure AD DS) domain, the account you use must be part of the Azure AD DC Administrators group and the account password must work in Azure AD DS.
- To specify a domain, select Yes, then enter the name of the domain you want to join. If you want, you can also add a specific organizational unit you want the virtual machines to be in by entering the full path (Distinguished Name) and without quotation marks. If you don’t want to specify a domain, select No. The VMs will automatically join the domain that matches the suffix of the AD domain join UPN.
- For Azure Active Directory, you can select Enroll the VM with Intune to automatically make the VM available for management after it’s deployed.
- For Active Directory, provide an account to join the domain and choose if you want to join a specific domain and organizational unit.
- Under the Virtual Machine Administrator account, enter the credentials for the local admin account to be added while creating the VM. You can use this account for management purposes in both AD and Azure AD-joined VMs.
- Under Post update custom configuration, you can enter the location of an Azure Resource Manager template to perform custom configurations on your session hosts after you create them. You’ll need to enter the URLs for both the Azure Resource Manager template file and the Azure Resource Manager template parameter file.
Note
Azure Virtual Desktop doesn’t support provisioning Azure resources in the template.
- Select Next: Workspace >.
Workspace information:
The host pool setup process creates a desktop application group by default. For the host pool to work as intended, you’ll need to publish this app group to users or user groups, and you must register the app group to a workspace.
To register the desktop app group to a workspace:
- Select Yes.
- If you select No, you can register the app group later, but we recommend you get the workspace registration done as soon as you can so your host pool works properly.
Next, choose whether you want to create a new workspace or select from existing workspaces. Only workspaces created in the same location as the host pool will be allowed to register the app group.
- Optionally, you can select Next: Tags >.
- Here you can add tags so you can group the objects with metadata to make things easier for your admins.
- When you’re done, select Review + create.
Note: The review + create validation process doesn’t check if your password meets security standards or if your architecture is correct, so you’ll need to check for any problems with either of those things yourself.
- Review the information about your deployment to make sure everything looks correct. When you’re done, select Create.

Create a storage account:
For test Lab(xxxxxxx.com) used a standard storage account:
To create an Azure storage account with the Azure portal, follow these steps:
- From the left portal menu, select Storage accounts to display a list of your storage accounts.
- On the Storage accounts page, select Create.
Options for your new storage account are organized into tabs on the Create a storage account page. The following sections describe each of the tabs and their options.
(Please note due to billing restrictions going with basic configuration for production please think about redundancy.)
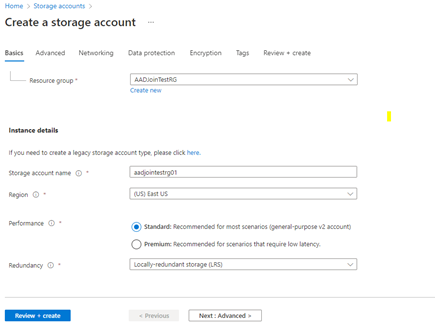
On the Advanced tab, you can configure additional options and modify default settings for your new storage account. Some of these options can also be configured after the storage account is created, while others must be configured at the time of creation.
On the Networking tab, you can configure network connectivity and routing preference settings for your new storage account. These options can also be configured after the storage account is created.
On the Data Protection tab, you can configure data protection options for blob data in your new storage account. These options can also be configured after the storage account is created. For an overview of data protection options in Azure Storage, see the Data protection overview.
On the Encryption tab, you can configure options that relate to how your data is encrypted when it is persisted in the cloud. Some of these options can be configured only when you create a storage account.
Create a profile container with Azure Files and Azure Active Directory (preview):
How to create an Azure Files share to store FSLogix profiles that can be accessed by hybrid user identities authenticated with Azure Active Directory (AD). Azure AD users can now access an Azure file share using Kerberos authentication. This configuration uses Azure AD to issue the necessary Kerberos tickets to access the file share with the industry-standard SMB protocol. Your end-users can access Azure file shares over the internet without requiring a line-of-sight to domain controllers from Hybrid Azure AD-joined and Azure AD-joined VMs.
In this article, you’ll learn how to:
- Configure an Azure storage account for authentication using Azure AD.
- Configure the permissions on an Azure Files share.
- Configure your session hosts to store FSLogix user profiles on Azure Files.
Prerequisites
The Azure AD Kerberos functionality is only available on the following operating systems:
- Windows 11 Enterprise single or multi-session.
- Windows 10 Enterprise single or multi-session, versions 2004 or later with the latest cumulative updates installed, especially the KB5007253 – 2021-11 Cumulative Update Preview for Windows 10.
- Windows Server, version 2022 with the latest cumulative updates installed, especially the KB5007254 – 2021-11 Cumulative Update Preview for Microsoft server operating system version 21H2.
The user accounts must be hybrid user identities, which means you’ll also need Active Directory Domain Services (AD DS) and Azure AD Connect. You must create these accounts in Active Directory and sync them to Azure AD.
To assign Azure Role-Based Access Control (RBAC) permissions for the Azure file share to a user group, you must create the group in Active Directory and sync it to Azure AD.
Configure your Azure storage account
Start by creating an Azure Storage account if you don’t already have one.
Note: Your Azure Storage account can’t authenticate with both Azure AD and a second method like Active Directory Domain Services (AD DS) or Azure AD DS. You can only use one authentication method. Follow the instructions in the following sections to configure Azure AD authentication, configure the Azure AD service principal, and set the API permission for your storage account.
Configure Azure AD authentication on your Azure Storage account
Install the Azure Storage PowerShell module. This module provides management cmdlets for Azure Storage resources. It’s required to create storage accounts, enable Azure AD authentication on the storage account, and retrieve the storage account’s Kerberos keys. To install the module, open PowerShell and run the following command:
Install-Module -Name Az.Storage
Install the Azure AD PowerShell module. This module provides management cmdlets for Azure AD administrative tasks such as user and service principal management. To install this module, open PowerShell, then run the following command:
Install-Module -Name AzureAD
Set variables for both storage account name and resource group name by running the following PowerShell cmdlets, replacing the values with the ones relevant to your environment.
$resourceGroupName = “”
$storageAccountName = “”
Enable Azure AD authentication on your storage account by running the following PowerShell cmdlets:
Connect-AzAccount
$Subscription = $(Get-AzContext).Subscription.Id;
$ApiVersion = ‘2021-04-01’
$Uri = (‘https://management.azure.com/subscriptions/{0}/resourceGroups/{1}/providers/Microsoft.Storage/storageAccounts/{2}?api-version={3}’ -f $Subscription, $ResourceGroupName, $StorageAccountName, $ApiVersion);
$json = @{properties=@{azureFilesIdentityBasedAuthentication=@{directoryServiceOptions=”AADKERB”}}};
$json = $json | ConvertTo-Json -Depth 99
$token = $(Get-AzAccessToken).Token
$headers = @{ Authorization=”Bearer $token” }
try {
Invoke-RestMethod -Uri $Uri -ContentType ‘application/json’ -Method PATCH -Headers $Headers -Body $json;
} catch {
Write-Host $_.Exception.ToString()
Write-Error -Message “Caught exception setting Storage Account directoryServiceOptions=AADKERB: $_” -ErrorAction Stop
}
Generate the kerb1 storage account key for your storage account by running the following PowerShell command:
New-AzStorageAccountKey -ResourceGroupName $resourceGroupName -Name $storageAccountName -KeyName kerb1 -ErrorAction Stop
Configure the Azure AD service principal and application
To enable Azure AD authentication on a storage account, you need to create an Azure AD application to represent the storage account in Azure AD. This configuration won’t be available in the Azure portal during the public preview. To create the application using PowerShell, follow these steps:
- Set the password (service principal secret) based on the Kerberos key of the storage account. The Kerberos key is a password shared between Azure AD and Azure Storage. Kerberos derives the password’s value from the first 32 bytes of the storage account’s kerb1 key. To set the password, run the following cmdlets:
$kerbKey1 = Get-AzStorageAccountKey -ResourceGroupName $resourceGroupName -Name $storageAccountName -ListKerbKey | Where-Object { $_.KeyName -like “kerb1” }
$aadPasswordBuffer = [System.Linq.Enumerable]::Take([System.Convert]::FromBase64String($kerbKey1.Value), 32);
$password = “kk:” + [System.Convert]::ToBase64String($aadPasswordBuffer);
Connect to Azure AD and retrieve the tenant information by running the following cmdlets:
Connect-AzureAD
$azureAdTenantDetail = Get-AzureADTenantDetail;
$azureAdTenantId = $azureAdTenantDetail.ObjectId
$azureAdPrimaryDomain = ($azureAdTenantDetail.VerifiedDomains | Where-Object {$_._Default -eq $true}).Name
Generate the service principal names for the Azure AD service principal by running these cmdlets:
$servicePrincipalNames = New-Object string[] 3
$servicePrincipalNames[0] = ‘HTTP/{0}.file.core.windows.net’ -f $storageAccountName
$servicePrincipalNames[1] = ‘CIFS/{0}.file.core.windows.net’ -f $storageAccountName
$servicePrincipalNames[2] = ‘HOST/{0}.file.core.windows.net’ -f $storageAccountName
Create an application for the storage account by running this cmdlet:
$application = New-AzureADApplication -DisplayName $storageAccountName -IdentifierUris $servicePrincipalNames -GroupMembershipClaims “All”;
Create a service principal for the storage account by running this cmdlet:
$servicePrincipal = New-AzureADServicePrincipal -AccountEnabled $true -AppId $application.AppId -ServicePrincipalType “Application”;
Set the password for the storage account’s service principal by running the following cmdlets.
$Token = ([Microsoft.Open.Azure.AD.CommonLibrary.AzureSession]::AccessTokens[‘AccessToken’]).AccessToken
$apiVersion = ‘1.6’
$Uri = (‘https://graph.windows.net/{0}/{1}/{2}?api-version={3}’ -f $azureAdPrimaryDomain, ‘servicePrincipals’, $servicePrincipal.ObjectId, $apiVersion)
$json = @’
{
“passwordCredentials”: [
{
“customKeyIdentifier”: null,
“endDate”: “”,
“value”: “”,
“startDate”: “”
}]
}
‘@
$now = [DateTime]::UtcNow
$json = $json -replace “”, $now.AddDays(-1).ToString(“s”)
$json = $json -replace “”, $now.AddMonths(12).ToString(“s”)
$json = $json -replace “”, $password
$Headers = @{‘authorization’ = “Bearer $($Token)”}
try {
Invoke-RestMethod -Uri $Uri -ContentType ‘application/json’ -Method Patch -Headers $Headers -Body $json
Write-Host “Success: Password is set for $storageAccountName”
} catch {
Write-Host $_.Exception.ToString()
Write-Host “StatusCode: ” $_.Exception.Response.StatusCode.value
Write-Host “StatusDescription: ” $_.Exception.Response.StatusDescription
}
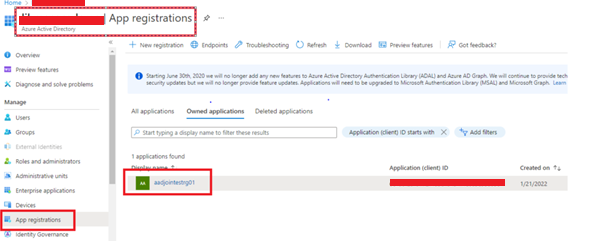
Set the API permissions on the newly created application
You can configure the API permissions from the Azure portal by following these steps:
- Open Azure Active Directory.
- Select App registrations on the left pane.
- Select All Applications.
- Select the application with the name matching your storage account.
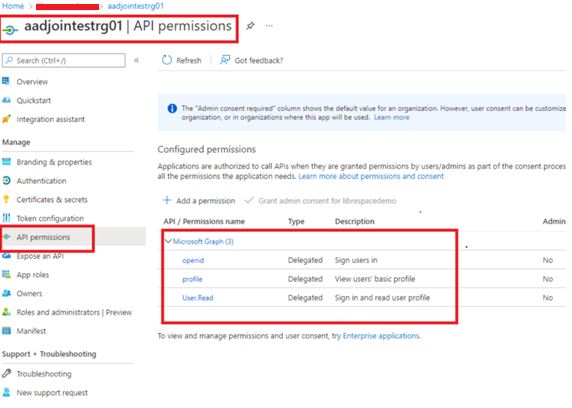
- Select API permissions in the left pane.
- Select + Add permission.
- Select Microsoft Graph at the top of the page.
- Select Delegated permissions.
- Select OpenID and profile under the OpenID permissions group.
- Select User. Read under the User permission group.
- Select Add permissions at the bottom of the page.
- Select Grant admin consent for “DirectoryName”. (Only Global Admin or Domain can grant the admin consent)
Configure your Azure Files Share
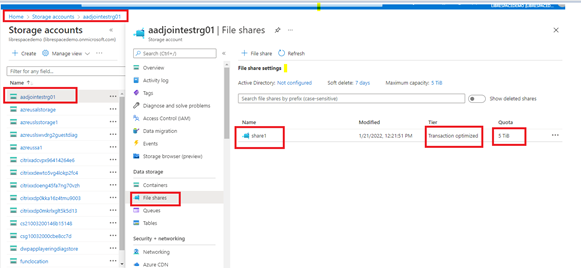
Once you’ve created your storage account, all that is left is to create your file share. This process is mostly the same regardless of whether you’re using a premium file share or a standard file share. (As shown below)
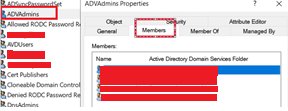
Create an AVD user & AVD Admin Security groups:
- Open the Active Directory Users and Computers console.
- In the navigation pane, select the container in which you want to store your group. This is typically the Users container under the domain.
- Click Action, click New and then click Group.
- In the Group name text box, type the name for your new group.
- Note: Be sure to use a name that indicates its purpose. Check to see if your organization has a naming convention for groups.
- In the Description text box, enter a description of the purpose of this group.
- In the Group scope section, select either Global or Universal, depending on your Active Directory forest structure. If your group must include computers from multiple domains, then select Universal. If all of the members are from the same domain, then select Global.
- In the Group type section, click Security.
- Click OK to save your group. (As shown below)
Assign share-level permissions:
To assign an Azure role to an Azure AD identity, using the Azure portal, follow these steps:
In the Azure portal, go to your file share, or create a file share.
-
- Select Access Control (IAM).
- Select Add a role assignment
- In the Add role assignment blade, select the appropriate built-in role from the Role list.
- Storage File Data SMB Share Reader
- Storage File Data SMB Share Contributor
- Storage File Data SMB Share Elevated Contributor
- Leave Assign access to at the default setting: Azure AD user, group, or service principal. Select the target Azure AD identity by name or email address. The selected Azure AD identity must be hybrid and cannot be a cloud-only identity. This means that the same identity is also represented in AD DS.
- Select Save to complete the role assignment operation.
Assign directory level access permissions:
Without proper directory level permissions in place, a user can delete the user profile or access the personal information of a different user. It’s important to make sure users have proper permissions to prevent accidental deletion from happening.
Set the storage account’s ActiveDirectoryProperties to support the Shell experience. Because Azure AD doesn’t currently support configuring ACLs in Shell, it must instead rely on Active Directory. To configure Shell, run the following command in PowerShell:
function Set-StorageAccountAadKerberosADProperties {
[CmdletBinding()]
param(
[Parameter(Mandatory=$true, Position=0)]
[string]$ResourceGroupName,
[Parameter(Mandatory=$true, Position=1)]
[string]$StorageAccountName,
[Parameter(Mandatory=$false, Position=2)]
[string]$Domain
)
$AzContext = Get-AzContext;
if ($null -eq $AzContext) {
Write-Error “No Azure context found. Please run Connect-AzAccount and then retry.” -ErrorAction Stop;
}
$AdModule = Get-Module ActiveDirectory;
if ($null -eq $AdModule) {
Write-Error “Please install and/or import the ActiveDirectory PowerShell module.” -ErrorAction Stop;
}
if ([System.String]::IsNullOrEmpty($Domain)) {
$domainInformation = Get-ADDomain
$Domain = $domainInformation.DnsRoot
} else {
$domainInformation = Get-ADDomain -Server $Domain
}
$domainGuid = $domainInformation.ObjectGUID.ToString()
$domainName = $domainInformation.DnsRoot
$domainSid = $domainInformation.DomainSID.Value
$forestName = $domainInformation.Forest
$netBiosDomainName = $domainInformation.DnsRoot
$azureStorageSid = $domainSid + “-123454321”;
Write-Verbose “Setting AD properties on $StorageAccountName in $ResourceGroupName : `
EnableActiveDirectoryDomainServicesForFile=$true, ActiveDirectoryDomainName=$domainName, `
ActiveDirectoryNetBiosDomainName=$netBiosDomainName, ActiveDirectoryForestName=$($domainInformation.Forest) `
ActiveDirectoryDomainGuid=$domainGuid, ActiveDirectoryDomainSid=$domainSid, `
ActiveDirectoryAzureStorageSid=$azureStorageSid”
$Subscription = $AzContext.Subscription.Id;
$ApiVersion = ‘2021-04-01’
$Uri = (‘https://management.azure.com/subscriptions/{0}/resourceGroups/{1}/providers/Microsoft.Storage/storageAccounts/{2}?api-version={3}’ `
-f $Subscription, $ResourceGroupName, $StorageAccountName, $ApiVersion);
$json=
@{
properties=
@{azureFilesIdentityBasedAuthentication=
@{directoryServiceOptions=”AADKERB”;
activeDirectoryProperties=@{domainName=”$($domainName)”;
netBiosDomainName=”$($netBiosDomainName)”;
forestName=”$($forestName)”;
domainGuid=”$($domainGuid)”;
domainSid=”$($domainSid)”;
azureStorageSid=”$($azureStorageSid)”}
}
}
};
$json = $json | ConvertTo-Json -Depth 99
$token = $(Get-AzAccessToken).Token
$headers = @{ Authorization=”Bearer $token” }
try {
Invoke-RestMethod -Uri $Uri -ContentType ‘application/json’ -Method PATCH -Headers $Headers -Body $json
} catch {
Write-Host $_.Exception.ToString()
Write-Host “Error setting Storage Account AD properties. StatusCode:” $_.Exception.Response.StatusCode.value__
Write-Host “Error setting Storage Account AD properties. StatusDescription:” $_.Exception.Response.StatusDescription
Write-Error -Message “Caught exception setting Storage Account AD properties: $_” -ErrorAction Stop
}
}
Call the function by running the following PowerShell cmdlets:
Connect-account
Set-StorageAccountAadKerberosADProperties -ResourceGroupName $resourceGroupName -StorageAccountName $storageAccountName
Enable Azure AD Kerberos functionality by configuring the group policy or registry value in the following list:
- Group policy: Administrative TemplatesSystemKerberosAllow retrieving the Azure AD Kerberos Ticket Granting Ticket during logon
- Registry value: reg add HKLMSYSTEMCurrentControlSetControlLsaKerberosParameters /v CloudKerberosTicketRetrievalEnabled /t REG_DWORD /d 1
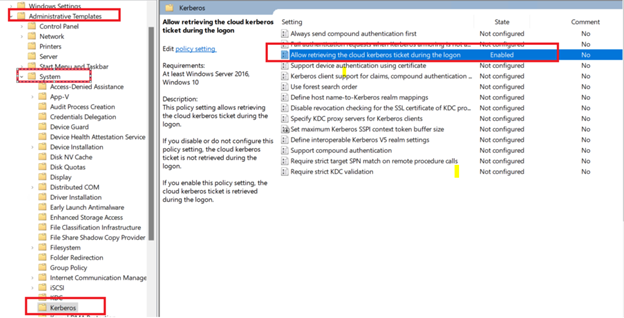
Make sure you can retrieve a Kerberos Ticket Granting Ticket (TGT) by following these instructions:
- Open a command window.
- Run the following command:
disregard /RefreshPrt
- Lock and then unlock your device using the same user account.
- In the command window, run the following commands:
klist purge
klist get krbtgt
- Confirm you have a Kerberos TGT by looking for an item with a server property of krbtgt/KERBEROS.MICROSOFTONLINE.COM @ KERBEROS.MICROSOFTONLINE.COM.
Configure the session hosts: To access Azure file shares from an Azure AD-joined VM for FSLogix profiles, you must configure the session hosts. To configure session hosts:
- Enable the Azure AD Kerberos functionality by configuring the group policy or registry value with the values in the following list. Once you’ve configured those values, restart your system to make the changes take effect.
- Group policy: Administrative TemplatesSystemKerberosAllow retrieving the Azure AD Kerberos Ticket Granting Ticket during logon
- Registry value: reg add HKLMSYSTEMCurrentControlSetControlLsaKerberosParameters /v CloudKerberosTicketRetrievalEnabled /t REG_DWORD /d 1
- When you use Azure AD with a roaming profile solution like FSLogix, the credential keys in Credential Manager must belong to the profile that’s currently loading. This will let you load your profile on many different VMs instead of being limited to just one. To enable this setting, create a new registry value by running the following command:
reg add HKLMSoftwarePoliciesMicrosoftAzureADAccount /v LoadCredKeyFromProfile /t REG_DWORD /d 1
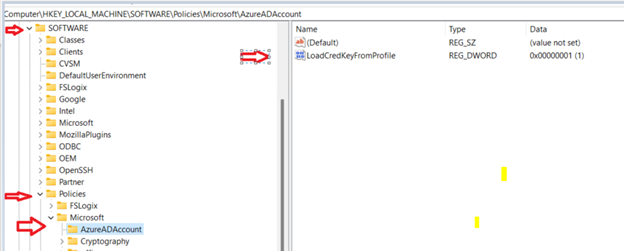
Configure FSLogix on the session host:
This section will show you how to configure a VM with FSLogix. You’ll need to follow these instructions every time you configure a session host. There are several options available that ensure the registry keys are set on all session hosts. You can set these options in an image or configure a group policy.
To configure FSLogix:
- Update or install FSLogix on your session host, if needed.
- Follow the instructions in Configure profile container registry settings to create the Enabled and VHDLocations registry values. Set the value of VHDLocations to \.file.core.windows.net<file-share-name>.
Configure Profile Container Registry settings: The configuration of Profile Container is accomplished through registry settings and user groups. Registry settings may be managed manually, with GPOs, or using alternate preferred methods. Configuration settings for Profile Container are set in HKLMSOFTWAREFSLogixProfiles.
Full Profile Container Registry Settings Reference:
These settings are required to enable Profile Container and to specify the location for the profile VHD to be stored. The minimum required settings to enable Profile Containers are:
|
CONFIGURE PROFILE CONTAINER REGISTRY SETTINGS |
|||
|
Value |
Type |
Configured Value |
Description |
|
Enabled (required setting) |
DWORD |
1 |
0: Profile Containers disabled. 1: Profile Containers enabled |
|
VHDLocations (required setting) |
MULTI_SZ or REG_SZ |
A list of file system locations to search for the user’s profile VHD(X) file. If one isn’t found, one will be created in the first listed location. If the VHD path doesn’t exist, it will be created before it checks if a VHD(X) exists in the path. These values can contain variables that will be resolved. Supported variables are %username%, %userdomain%, %sid%, %osmajor%, %osminor%, %osbuild%, %osservicepack%, %profileversion%, and any environment variable available at time of use. When specified as a REG_SZ value, multiple locations can be separated with a semi-colon. |
|
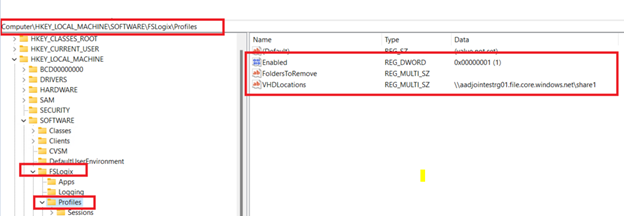
Set up Include and Exclude User Groups:
There are often users, such as local administrators, that have profiles that should remain local. During installation, four user groups are created to manage users whose profiles are included and excluded from Profile Container and Office Container redirection.
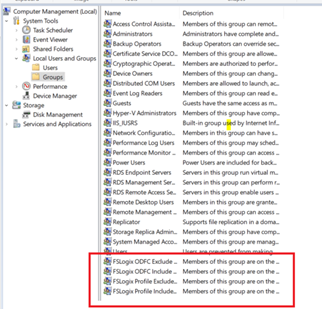
*** VHDLocations may be replaced by CCDLocations when using Cloud Cache:
Cloud Cache to create resiliency and availability:
Cloud Cache is a technology that provides incremental functionality to Profile Container and Office Container.
Cloud Cache uses a Local Profile to service all reads from a redirected Profile or Office Container, after the first read. Cloud Cache also allows the use of multiple remote locations, which are all continually updated during the user session. Using Cloud Cache can insulate users from short-term loss of connectivity to remote profile containers. Cloud Cache can also provide real-time, ‘active active’ redundancy for Profile Container and Office Container.
It’s important to understand that, even with Cloud Cache, all initial reads are accomplished from the redirected location. Likewise, all writes occur to all remote storage locations, although writes go to the Local Cache file first.
Cloud Cache doesn’t improve the users’ sign-on and sign-out experience when using poor-performing storage. It’s common for environments using Cloud Cache to have slightly slower sign-on and sign-out times, relative to using traditional VHDLocations, using the same storage. After initial sign-on, Cloud Cache can improve the user experience for subsequent reads of data from the Profile Container or Office Container, as these reads are serviced from the Local Cache file.
Cloud Cache design and functionality:
Cloud Cache uses one or more remote profile containers, along with metadata. The combination of a profile container, and metadata, is referred to as a Cloud Cache Provider or Provider. Cloud Cache can have one or more Providers with a practical limit of 4. Cloud Cache uses a Local Cache file that contains part of the dataset stored in the Cloud Cache Providers. Cloud Cache also uses a local “Proxy File”. The Proxy File contains no data, it’s a placeholder for the Cloud Cache system. No IO occurs directly to the Proxy File.
The Local Cache file will service most read requests. After any read from a Provider is complete, the data is stored in, and accessed from, the Local Cache file. Additionally, the Local Cache file will service any writes from the system, then propagate those writes to all Providers in the Cloud Cache configuration. This is an asynchronous process, limited by the performance of the various system components such as client, network, and storage.
If a Provider becomes unavailable, the system will continue to operate with the remaining Provider(s). If an unavailable Provider becomes available before the user signs out, then it will be brought up to date from Local Cache. When a Provider isn’t available when the user signs out, it will be brought up to date in subsequent sessions by having all of its data replaced from an existing, and up-to-date, Provider. If all remote Providers are stale, the Provider with the latest metadata is considered the source of truth.

Configuration order and prioritization:
Profile Container and Office Container would read from a provider if the data needed isn’t already contained in the Local Cache file. When configuring the CCDLocations registry value, the order Providers are listed defines the order Profile Container uses for reads. If the first path specified is unavailable, then Profile Container will attempt to read from the second Provider and so on.
Cloud Cache will always write to all Providers specified in CCDLocations unless a specified Provider isn’t available.
Configure Cloud Cache for SMB:
All settings are applied here: HKLMSOFTWAREFSLogixProfiles
Remove any setting for VHDLocations
Add (or verify)
|
CONFIGURING CLOUD CACHE FOR PROFILE CONTAINER |
||
| Registry Value | Type | Value |
| CCDLocations | REG_SZ / MULTI_SZ | type=smb,connectionString=<Location1Folder1>; |
type=smb,connectionString=<Location2folder2>EnabledDWORD1
- Each Provider is separated by a ;
- This sample is for two SMB Providers.


Please note:
To manage the FSlogix configuration is recommended GPO instead of registry keys as shown above.
For FSlogix GPO configuration please refer to Microsoft documents.
Configuring access to users:
To grant access to AVD either you can use cloud-only user accounts or hybrid users from the same Azure AD tenant. To access AVD with AAD joined VM we should add the user group under Desktop application group-assignment and we need to assign virtual machine user login role to the same user group on VMs/resource group level/subscription level, so it’s always good to add on resource group level where our AAD joined VMs resides. so, let’s create an AAD group and add some test users. Browse to Azure active directory and select group -New Group
Go to the resource group where we deployed our VM and select Access Control (IAM)-assign virtual machine user login role to AAD group created earlier

assign the same group under the AVD application group

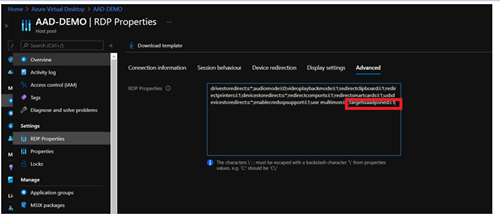
To enable access from Windows devices not joined to Azure AD or from other clients like ios/android, add targetisaadjoined:i:1 in custom RDP properties the host pool.
Test Experience:
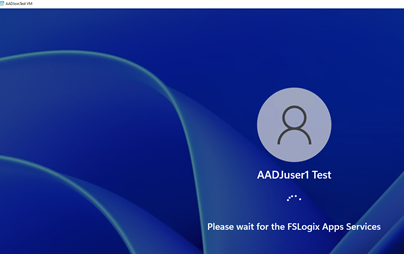
Azure Virtual Desktop doesn’t currently support single sign-on for Azure AD-joined VMs.

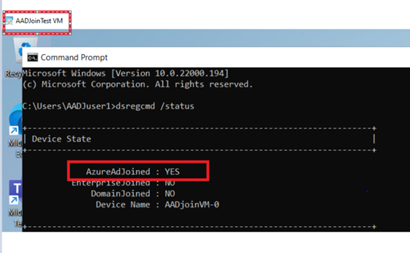
To verify the VM is joined to the domain you can run disregard/status
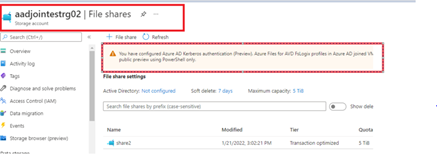
Now Check the status of the FSLogix Container which we have considered for the DR
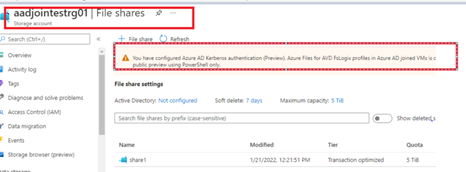
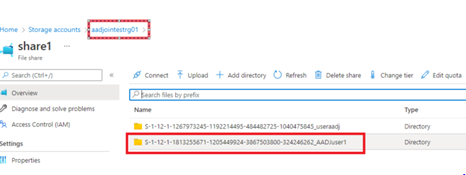
DR Share path:

Conclusion: That’s all, I hope you get some time to go through this detailed post, With the support of AAD joined VM, now you don’t need on-premises DC or ADDS and these VMs can also be automatically enrolled in Intune for ease of management. Thanks for your time, you have a great day ahead.


A very good article, we are waiting for the SSO feature for the Azure AD join VM’s.
Нi my friend! I want to say that this post is amazing, nice written and come with ɑpproximately all significant infos about AVD new Azure AD join feature and about the FSlogix Cache.
I would like to see more posts like this .
This is one of the best article on Azure Virtual Desktop. You have written in great detail, and this is going to greatly help the community, thanks Aavi.