Understand the Citrix Cloud License Dashboard for DaaS Part II
This is the 2nd part of the article where we have discussed about the Citrix License Dashboard. Today we will view the following: In the 1st part of the article, we discussed the domain name truncation feature.
Usage Trend
For a comprehensive overview of your licenses, click on “View Usage Details” located at the far right of the summary. Here, you can delve into detailed insights, including usage trends and specific information about individual users and devices utilizing cloud service licenses.

In the License Assignment graph, selecting a specific month or day’s bar provides the following information:
Total Licenses: This represents the total number of licenses you have purchased for the cloud service across all entitlements.
Assigned Users: This shows the cumulative number of licenses that have been assigned to users up to the current month.
Assigned Devices: This displays the cumulative number of licenses assigned to devices up to the current month. If this number appears unusually high for a particular month, it might be due to app or desktop launches occurring through a web browser. To reduce this number, Citrix recommends using a locally installed Workspace app.
Newly Assigned: This indicates the number of new licenses assigned for each month. For example, if a user accesses the cloud service for the first time in July and is assigned a license, this license is counted as “Newly Assigned” for the month of July.
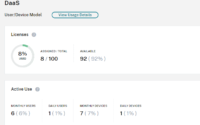
Active Use
In the Active Use graph, you can observe the active users and devices for the previous calendar month and calendar year, respectively. When you hover over a specific interval on the graph, it displays the number of active users or devices along with the corresponding usage percentage.

License Activity
The License Activity section displays the following information:
A list of the individual users who have assigned licenses, including associated devices.

A list of the devices that have assigned licenses, including associated users.

The date when a license was assigned to the user or device.
Release Assigned Licenses
When a license is assigned, it remains active for a period of 90 days during which the user or device establishes a connection to the service. If, within these 90 days, a user or device does not launch an app or desktop, these licenses are considered unused. Citrix Cloud automatically releases these unused licenses after the 90-day period without requiring any action from the administrator.
However, after the initial 90-day assignment period, administrators have the option to manually release licenses in the following specific scenarios:
- The user is no longer associated with the company.
- The user is on an extended leave of absence.
- Additionally, administrators can release licenses for devices only when those devices are no longer in service.
Releasable Licenses
If a user or device has not accessed an app or desktop for 30 days, Citrix Cloud marks the license as releasable. These releasable licenses can be identified in the Licensed Users or Licensed Devices list by a dark gray checkbox, which can be selected. Licenses that are not releasable are indicated by a light gray checkbox, signifying that these licenses cannot be selected for release.
To locate releasable licenses quickly, click Show only releasable licenses, next to the Release Licenses button. This action hides assigned licenses that aren’t yet allowed to be released.

Select releasable licenses.
Select the dark gray checkbox next to each license to select it for release. When you select a license from the list, the Release Licenses button becomes active.
You can select all releasable licenses one-by-one and click Release Licenses.
To release assigned licenses, follow these steps:
Navigate to License Activity and click on the Licensed Users or Licensed Devices tab.
If necessary, click on “Show releasable licenses” to filter and display only users with licenses eligible for release.
Choose the specific users or devices you wish to manage, then click on “Release Licenses.”
Review the users or devices you’ve selected, and once confirmed, click on “Release Licenses” again to complete the process.
That’s the end of Part II of this article. Thanks for reading. You have a nice day ahead.
Citrix PVS on Azure Part – 1

Configure the Clipboard Transfer direction in Azure Virtual Desktop (Preview) with Ansible