New watermark in Azure Virtual Desktop and how to implement the same step-by-step in your AVD environment
Even a small leak could sink a great ship; every detail needs to be considered to foresee possible breaches. Looking forward to the security requirement in the VDI world, Microsoft has brought in the watermarking in AVD which Citrix implemented a few years back, however, it has some additional features. Let’s see more details about this.
What is a traceable watermark?
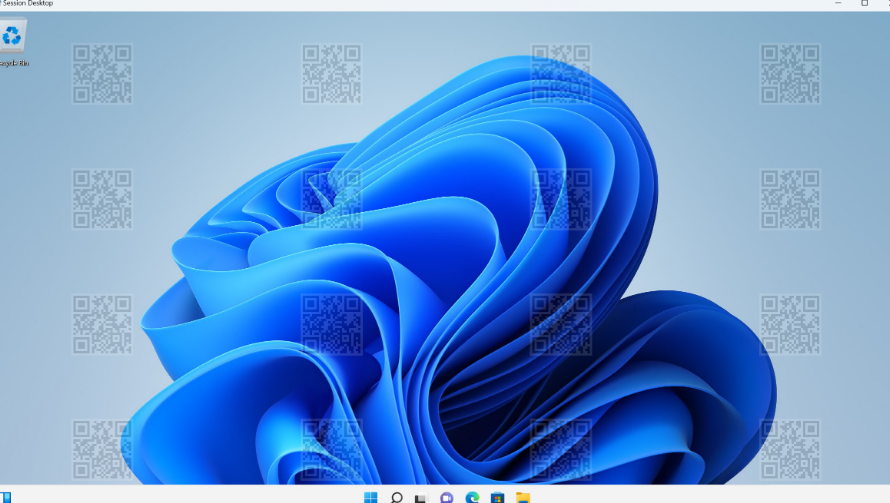
This information that can be tracked shows up on the AVD session desktop to stop people from stealing data by taking pictures or screen captures. The watermarking can be considered a security feature. The solution does not prevent data theft completely, but it provides some level of deterrent and traceability. By scanning the QR code you can understand from which AVD user session data is leaked.
When is it announced for AVD?
Watermarking for Azure Virtual Desktop (AVD) has been announced by Microsoft on the 31st of Jan. 2023. This wonderful feature is currently available for public preview. This feature enables watermarks to show up as a part of remote desktops, preventing sensitive information from being collected on client endpoints. Along with screen capture security, watermarking (preview) aids in preventing the collection of sensitive data on client endpoints. When watermarking is enabled, remote desktops provide QR code watermarks. The connection ID of a remote session is contained in the QR code, which administrators can use to track the session. The Remote Desktop client implements and enforces watermarking on session hosts.

Some important points to note bout this new feature are as follows:
Only clients that support watermarking can connect to a session host once it has enabled watermarking. Any attempt to connect from an unsupported client will result in a failed connection and an ambiguous error message.
Watermarking is only applicable to remote desktops. Watermarking is not used with remote apps, and connectivity is permitted.
Watermarking is not used, and the connection is permitted if you connect to a session host directly (as opposed to through Azure Virtual Desktop) using the Remote Desktop Connection software (mstsc.exe).
Basic requirements
Before using watermarking, you’ll need the following:
AVD client that allows for watermarking. Watermarking is presently supported by the following clients:
Windows 10 and later, Windows Desktop client, version 1.2.3317 or later.
Configure Azure Virtual Desktop Insights for your settings.
Implementation Steps
First, you must obtain the administrative template for Azure Virtual Desktop (this is not yet available in Intune) from this link:
Import the template into your golden image locally or into Active Directory (if your AVD sessions are AD connected) (if your AVD sessions are AAD joined).
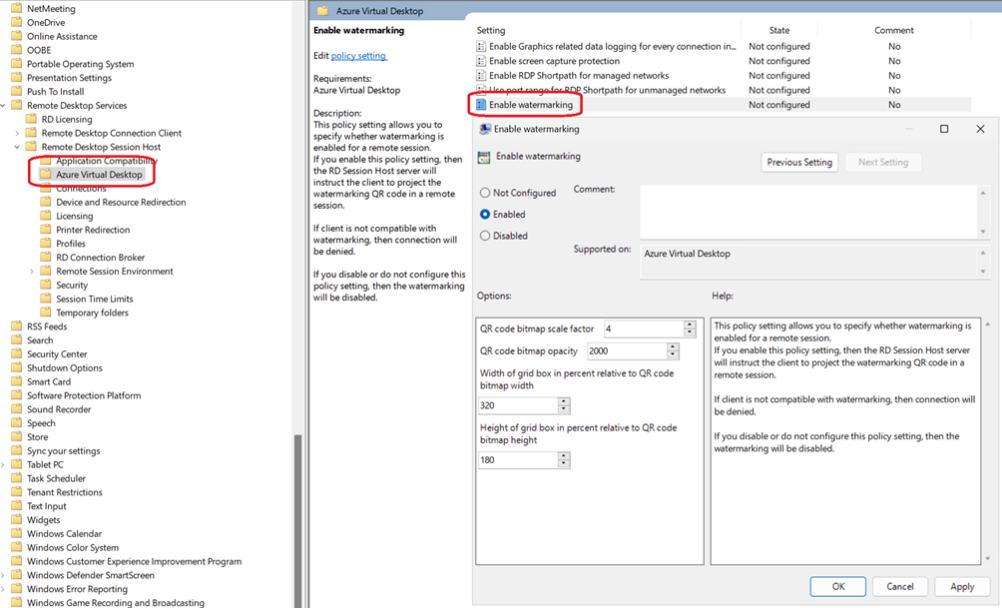
In the Windows Components section of Computer Configuration’s administrative templates, and then turn on the Enable watermarking setting. The location is as follows:
Computer Configuration\Administrative Templates\Windows Components\Remote Desktop Services\Remote Desktop Session Host\Azure Virtual Desktop

Here are the configuration parameters which you can follow:
- QR code bitmap scale factor:
- set the size in pixels of each QR code dot. This value determines how many the number of squares per dot in the QR code
- value between 1 and 10; the default is set to 4
- QR code bitmap opacity
- set the transparency of the watermark, where 100 is fully transparent
- a value between 100 and 9999; the default is set to 700
- Width of grid box in percent relevant to QR code bitmap width
- Determines the distance between the QR codes in percent. When combined with the height, a value of 100 would make the QR codes appear side-by-side and fill the entire screen
- value between 100 and 1000; the default value is set to 320
- Height of grid box in percent relevant to QR code bitmap width
- Determines the distance between the QR codes in percent. When combined with the width, a value of 100 would make the QR codes appear side-by-side and fill the entire screen
- value between 100 and 1000; the default value is set to 180
Once done, a QR code will be presented in the next session once the user logs in and when the policy has been applied.
The administrators can then scan or read the QR code to get the session information.
In order to find the session ID shown from the QR code under the Success rate of (re)establishing a connection (% of connections) list, access the AVD Insights workbook at https://aka.ms/avdi and connect there.

Using this below KQL query, you can also pull out the connection ID shown in the QR code.
WVDConnections

| where CorrelationId contains “<connection ID>”
That’s all I have for today, I hope you will like the post and have a great day ahead.


